I was raised on grits. You know the kind that popped all over the range and stuck to the bottom of the pan. I love them with butter and cheddar cheese. Growing up my mother would make them with country ham and red eyed gravy. I can remember on cold afternoons my Dad would come home with Butch our bird dog and he would have Quail stashed in every pocket in his hunting vest. I knew then we would be having grits and gravy with Quail fried to a golden brown. Gosh it was so good!
Category Archives: Brunch
Easy Danish Kringle
I found one of the easiest brunch recipes today. Your’re going to either hate me or love me. Especially when we’ve all made our New Year’s resolutions to be more healthy. It won’t hurt to indulge in just one small piece, though. The recipe is from one of my favorite recipe sources Pillsbury. It is a bake-off winner from 1998 and so simple that if will leave you wondering if you have done something wrong. I just bet that you have all the ingredients right there in your kitchen to get this started at your earliest convenience. You’ll need a Pillsbury pie crust, light brown sugar, softened butter, chopped pecans, and powdered sugar. While to pastry is coming to room temperature you can measure all your ingredients. In a mere 30 minutes you will have one of the best pastries that you could buy anywhere.
Now here’s how to put it together.
Sky-High Brunch Bake
Talk about a show stopper this Sky-High Brunch Bake is one that will stop you in your tracks! I could not resist making it when I saw the picture in Food and Family by Kraft. It is beautiful to look at and it is quite tasty. I am keeping this bookmarked to use during the holiday season for a brunch because the green spinach and red peppers are so colorful! Don’t let the beautiful picture intimidate you because it is super simple to make if you can get past rolling out the pastry dough. Just follow the thawing directions on the box. You can thaw it overnight in the refrigerator or leave it out for about 45 minutes ahead of time. I like to thaw it out in the refrigerator. If you let it get too warm just put it back in the refrigerator for a few minutes. The pastry dough is very forgiving. The rest of the recipe is a cinch to make. Trust me by saying the novice cook can pull this off without a hitch and come out smelling like a rose!
French Toast made under the Broiler
I have made French toast since I was 12 years old cooking breakfast for myself and my two younger sisters. French Toast was on the menu most mornings. You know it is easy if a 12-year-old can do it. I never followed a recipe. I just cracked 2 eggs, added milk, and mixed with a fork. I heated my mother’s cast iron skillet to a medium high heat. Then dropped a couple of tablespoons of butter into the skillet. As the butter heated I just dipped the bread into the egg mixture and threw it in the skillet. Perfection with some syrup. I could do this in less than ten minutes!
Egg and Sausage Breakfast Casserole
Recipes that are made ahead of time are some of the best to have in your back pocket. Just pull them out when you’re having company or heck just used them to treat yourself. I hate to be rushed and anything that can be done the day before makes life easier. I have been using this recipe for years. It is our traditional Christmas morning special. Many breakfast casseroles call for as many as a dozen eggs and this one only uses four eggs. That’s really reducing the amount of cholesterol which is a good thing.
French Toast
French Toast looks so sophisticated, but it is simple to put together. This is one of my favorite breakfast foods. When I was in high school it was my breakfast choice almost every day. I did not use a recipe nor did I make it fancy. All I did was whisk an egg with a little milk , dip white bread in the egg and cook in a cast iron skillet with a little butter. I drizzled with hot syrup and enjoyed with hot coffee.
Here is a recipe that I have been using for years with my classes. I prefer at home to make French toast the night before and pop it in the oven the next morning especially if we have company! It is just quicker.
Here’s what you need.
Filed under Bread, Breakfast, Brunch, French Toast
Sausage Bread
At meal time we all want something fast, easy and great tasting to prepare. Here is the answer. This sausage bread is great! You are going to love it for more reasons than just the taste.
The recipe is two recipes that I combined one from a friend and the other from Southern Living. It is a great main dish with a salad or you can serve as an appetizer at a party pairing it with a marinara sauce.
Using Pillsbury French Bread Dough spread it out onto parchment paper. Take it out of the refrigerator right before you need it. If you take it out too soon it makes it very hard to work with.
Brown sausage in a skillet and drain. For the best flavor I like to use the hot sausage.
Here you have the drained sausage 1/2 cup swiss cheese, 1/2 cup cheddar cheese, 1 egg, 1/2 teaspoon oregano, 1/2 teaspoon basil. and 1/2 teaspoon garlic. Mix together.
Roll the dough lengthwise. It is pretty easy to peel the parchment paper off the dough if it sticks. If you tear holes in it just pinch it together. Pinch the ends together and tuck under. Pinch the long side together and flip over.
Now just stick it the oven and bake. This is so much easier than homemade pizza and satisfies the pizza craving.
Here is the recipe. Enjoy!
Sausage Bread
- 1 lb. hot sausage browned and drained
- 1 can refrigerated French Bread dough
- 1/2 cup shredded swiss cheese
- 1/2 cup sharp cheddar cheese
- 1 egg slightly beaten
- 1/2 teaspoon oregano
- 1/2 teaspoon basil
- 1/2 teaspoon garlic
Cook sausage in a skillet until browned. Drain. Stir in the rest of ingredients together with sausage. Unroll dough into a rectangular shape onto parchment paper. Sprinkle evenly with sausage mixture. Beginning with long side roll up, jelly roll style. Turn seam side down on baking sheet, and pinch ends to secure filling inside. cut slits across top of dough with a knife or scissors. Bake at 350 degrees for 30 minutes or until browned. Let stand for 10 minutes before slicing.
Happy Cooking,
The Teacher Cooks
Cream Puffs
Teaching high school takes a lot of planning, but there are times that I do things on the spur of the moment that really add alot to the class. This is one of them. Today the students took a test and we started a new unit. I thought we needed something a little more interesting. This demo only took about 15 minutes of class time. While they were cooking the students took their test.
I have been making cream puffs since college. As a freshman I worked for the Family and Consumer Science Department Head. I thought I would be typing, grading essays that kind of thing, but that was not always the case. Thank goodness I loved to cook. She was in charge of every event that involved food. Not sit down meals, but everything else.
I left there knowing how to make every kind of cookie, sandwich, cheese straw, punch, and candy recipe. I loved it! It was so much fun and I learned a lot.
Here is one of the recipes that I made.
Cream puffs are very easy to make and will impress all your guests. You can fill them with pudding. I recommend you make it from scratch. It is much better than the instant that I used today, because of lack of time. Sweetened whipped cream would be an excellent choice, too. Let’s don’t leave out ICE CREAM. You could use that as a filling, too.
Since I am not a dessert person filling them with chicken or a seafood salad would be a hit. Or you could go all out and double the recipe and make one savory and one sweet. Whatever way you choose everyone is going to be impressed with your cooking skills.
My students now want to make these in class, but we don’t have time. We have to move on to more healthy choices. FRUITS and VEGETABLES
Here is the basic recipe that is found in every cookbook. Use your imagination and enjoy cooking!
Cream Puffs
- 1/2 cup water
- 1/4 cup margarine or butter
- 1/2 cup all purpose flour
- 1/4 teaspoon salt
- 2 eggs
Heat oven to 400 – 425 degrees. In a medium saucepan, heat water and margarine to boiling. Take off heat add flour and salt all at once. Stir vigorously until mixture leaves the sides of pan in a smooth compact ball. Let mixture cool slightly. Stirring will help to cool the mixture quicker. Be careful not to add your eggs too soon or you will have scrambled eggs. Add eggs one at a time, beating after each addition.
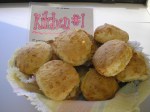
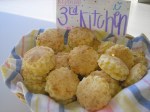
Spoon onto a cookie sheet lined with parchment paper. Make 6 very large cream puffs or use a tablespoon and make 20 snack size. ( In the picture are snack size).
You can pipe these from a pastry tube using a large fluted tip.
Bake small cream puffs for about 30 minutes. Bake large ones for about 40 minutes.
Doneness is important. They will collapse if they are underbaked. ( That question was on our test today) To fill them slice the top third and remove the uncooked dough if there is any. Now you will be able to fill the Cream Puff. When you finish just replace the top.
They should be filled as close to serving time as possible to preserve their crispness.
Unfilled they can be frozen for 3 months.
Happy Cooking,
The Teacher Cooks
Cheese Biscuits – Quick Bread Lab
I love teaching!! No, I mean I really LOVE teaching! Today anyway. It makes my day when my students come into the classroom and can’t wait for me to call the roll because they are so eager to get busy with their assignment . There has to be a reason for this other than the fact that they are all starving.
I read something on Monday when I attended the Leonardo DiVinci exhibit that could be the reason for the eagerness . Di Vinci said, ” Study without desire spoils the memory, and it retains nothing that it takes in.” Could it be a spark of passion here that has created this excitement? I hope so.
Cheese biscuits are the last of our quick bread labs and we go out with a perfect 10. As you look at the pictures you can see they did great! One group put the cheese in at the wrong time, but recovered very well. They learned from the first time not to add too much flour and surprisingly they were very good . We had a couple of equipment malfunctions. One oven was turned off by mistake and another did not heat properly.
I now feel as if our lab is a small reproduction of ” Top Chef” , because there is so much competition between the groups to be at the top of the post. It is quite comical. You would think that I am giving out money as an award. Competition is good, but I have to think of a way to tone this down before it ruins some friendships.
How do you prepare these little cheesy morsels? Check out Making Biscuits From Scratch and make one little change. Grate 1 1/2 cups of sharp cheddar cheese and add after cutting in the shortening.
Some information about grating cheese:
- Use a food processor
- Go ahead and grate a lot of it at one time
- Freeze what you don’t use
You might ask why not save time and use pre-grated cheese? I am not totally against it but, it is dry and not as flavorful. It is more expensive, too.
Okay I have to get to the gym . I ate more than my usual taste of each biscuit today. They were just sooo good that I could not resist. Hopefully I can STEP some of these calories off before they attach to my body as fat.
Enjoy the Bake-off pictures!
Happy Cooking,
The Teacher Cooks
- Almost perfect!!!
- These were great!
- Very Tasty!
- After my Heart!
- Good presentation
- Melt in your mouth good!
- Biscuits were very good!
- You always come up with something unique!
- These were yummy!
- This is quite an interesting presentation!
- Very Good
- These were so good!!