Category Archives: Recipes

Parmesan Chicken and Pasta with Anna’s Easy Tomato Sauce

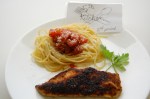
They got the most votes!

Yesterday my room was as if we were in a famous Italian restaurant.  I had teachers, administrators and students sticking their head in the door to see what we were cooking up.  Garlic in olive oil, then add oregano and  basil.  It permeated the halls making everyone hungry.  The food both classes made was the best!  All involved had really paid attention to the demo and seemed to know what they were doing.  

They had a lot of fun setting up for the photographs for the blog.  It is so funny to see some of the students wiping off the plates to make a better presentation.  The food network  has really changed the way we do a lot of things in the kitchen.   

This is a quick and easy meal to put together.  You can prepare it  and plate it up in about 45 minutes.  

Let’s get to the recipes.  The Parmesan Chicken came from Gracious Goodness  by The Junior League of Macon.  This cookbook is fantastic.   The Easy Tomato Sauce came from my best friend Anna.  She is a fantastic cook and you will be seeing more of her recipes later.  

Here are the photos to help you along and the recipes after that.  ENJOY! 

Butterfly 4 large boneless chicken breasts

Bread crumbs, salt, pepper, garlic powder, and parmesan cheese

Half stick butter cubed

Dip chicken in milk

Coat with crumbs (I use a fork)

Place a cube of butter in skillet and top with a piece of chicken

 Cook for about 7 minutes on each side. Here we used an electric skillet at 325 degrees.  I like using the skillet because you can get about eight servings in at once.  Adjust the temperature according to your skillet.  Some may cook faster and you will need to turn the heat down.  If yours seems to cook slower turn it up a bit.  Peak at it before the time is up.  It should be golden brown.  Your timing is important ,too.  Chicken cooked too long will be very dry. 

Why do some want to take a bent-edge spatula and push all the juices out of  the chicken?  I don’t understand it!!  I guess they don’t realize they are pushing out all of the juice and making it dry and tasteless.  

Notice another cube of butter on chicken before turning

 Cook for another 7 minutes or until it is done.  Remember don’t overcook it.  

2 Cans of Italian Tomatoes

Before you add 2 cans of diced Italian tomatoes saute a clove of garlic diced in a little olive oil.  Forgot to take that picture.  Sorry.  Then add seasonings 

Add 1/2 teaspoon of oregano

1/2 teaspoon of Basil ( add bay leaf,too)

Simmer for about 15 minutes and serve over your favorite pasta.  Top with parmesan cheese.  So easy and so delicious.  Thanks to Anna!!! 

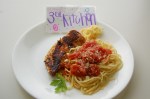
Second place only by 10 Votes!!

Here are the recipes for both: 

Parmesan Chicken 

  • 4 chicken breasts boneless
  • 1 cup of bread crumbs
  • 1/3 cup of Parmesan cheese
  • 1 teaspoon salt
  • 1/2 teaspoon pepper
  • 1/2 teaspoon garlic powder or more to taste
  • 1/2 stick butter
  • milk

Mix all dry ingredients together.  Dip chicken in milk, then in bread crumb mixture to coat.  Saute in butter over medium heat until done. About 7 minutes on each side.  Chicken will be browned and crisp. 

Anna’s Easy Tomato Sauce 

  • 1 Tablespoon olive oil
  • 1-2 cloves garlic
  • 1 28 oz. Italian tomatoes or 2 small cans
  • 1/2 teaspoon basil
  • 1/2 teaspoon oregano
  • 1 bay leaf
  • Parmesan cheese
  • Cooked pasta of your choice about 14 oz.

Saute garlic in olive oil.  Add tomatoes and seasonings.  Simmer for 15-20 minutes.  Serve over pasta.  Sprinkle with parmesan cheese. 

Enjoy, 

The Teacher Cooks

83 Comments

Filed under Chicken, Cooking, easy, pasta, quick, Recipes, Tomato

Pralines

Making candy is not my favorite thing to do.  Too many things can go wrong that you have no control over.  Humidity is one of them. And here in the South you know we have plenty of humidity.  I was so happy to find this recipe in my mailbox at school.  It was just by chance that I can now share this with you.

Vickie B.  a great English teacher submitted this for a school  cookbook that never hit the press.  Somehow it was placed in my box.  I am so thrilled!!  Thanks to Vickie all of us can enjoy these pralines.  I promise you that they are pretty close to what you can get on River Street in Savannah!  In other words they are fabulousa!!

So here is what it takes for you to be the best candymaker ever.  No need for a thermometer or worry if it is raining. Enjoy every melt in your mouth bite!  Here ya go!

2 cups of Toasted pecans

1 stick of butter in saucepan

Add 2/3 cup of heavy cream

Add 2 cups of brown sugar

Brown sugar, cream and butter

Just warming up!

Bring to a boil

Boil for 1 minute

Stir in 2 cups of powdered sugar

Stir in 2 cups of pecans and 2 t. vanilla

Stirring

Drop on wax paper

Vickie B.’s Louisiana Pralines

  • 1/2 cup real butter
  • 2 c. brown sugar
  • 2/3 c. heavy cream
  • 2 c. powdered sugar
  • 2 t. vanilla
  • 2 c. chopped, toasted pecans ( 200 Degrees for 15 min.)

Bring butter, brown sugar and cream to a boil, stir often.  Boil for 1 minute.  Remove and add vanilla, powdered sugar and pecans.  Drop on wax paper and cool.

Thank you Vickie for the great recipe.  Because of you I am a hit in Macon with this candy!!!

Happy Cooking,

The Teacher Cooks

86 Comments

Filed under Candy, Cooking, quick, Recipes

Sour Dough Bread

This is good stuff!

There is nothing better than fresh bread cooking in the oven.  The aroma will drive you crazy.  I love making this sour dough bread.  It taste great  and  makes your kitchen smell so good.    The first time I made it I also baked a ham .  When I took this bread out of the oven I could not resist putting mayonnaise on the fresh hot bread along with a piece of baked ham.  It was heaven.  I ate the whole loaf!!!

I have been making this for years.  But it is addictive so I can’t make it every week like I did when The Athlete was in high school. It’s one of those foods that goes straight to your hips.  Now it only shows up for special occasions .   Make this and give it to your friends.     They are going to love you!!!

Sour Dough Starter

  • 1 cup warm water
  • 1/2 cup sugar
  • 1 pkg. yeast
  • 3 T of potato flakes (level spoon)

Place the starter in a glass jar.  Do not use metal and stir with a wooden spoon.  Leave the mixture on the counter for 3 days.  Feed the starter and let it sit on the counter for another 8 hours.   It is going to bubble.  Below is the food for the starter.  After 8 hours refrigerate for 3-5 days.  Now you are ready to feed again and make bread.

In the morning take out the starter and feed it and sit on the counter.  You will be ready to make your bread in the evening.  Here’s what you add each time you feed this hungry little thing.  This starter can  be fed every day, but has to be fed at least once every 10 days to keep it from dying.  Another note :  Don’t keep alot of starter.  It will be too weak to rise.  Only keep 2-3 cups and give the other away to friends or pour it out. 

Food for the starter:

  • 1/2 cup sugar
  • 3 T potato flakes
  • 1 cup warm water

In the evening make the dough and let it rise overnight.  I have halved the original recipe so that I could use my bread machine .  The next morning I knead the dough, put it in pans to rise and bake it that evening.   Feel free to double it and make three large loaves of bread. 

Here is the recipe for the dough:

  • 3 1/2 cups bread flour
  • 1/4 cup sugar
  • 3/4 t salt
  • 1/2 starter ( stir it up to get some of the potato flakes)
  • 1/4 cup oil
  • 3/4 cup warm water

Sometimes I will cheat and add 1/2 t of yeast.  Why?   The starter is ornery.  Sometimes it does not act right.  If the temperature is too cool it will not rise like it should.  In the summer it does much better.  

liquid in first then dry ingredients


I use the dough cycle on my machine and let it knead for 5-8 min.  Let it rise 4 – 8 hours until double in size.  Punch down dough.  Knead lightly for about  5 minutes on a floured board.  You will have to add in extra flour.  Dough will be sticky. 

This is after about 8 minutes in the bread machine.

Overnight it has doubled

Knead dough for about 4 minutes

Divided dough into four equal pieces

Place into 4 greased pans

Dough in pans

Doubled in size

Divide the dough into four pieces.  Place in small greased bread pans. Let the dough rise in the pans until doubled.  I use the proofing cycle on my oven and it will take about 4-5 hours. 

 Bake at 325 degrees for about 20 – 25 minutes.  Butter the top and cool on a cooling rack.  This bread freezes well.  But with bread this good mine rarely gets to the freezer.

Happy cooking,

The Teacher Cooks

38 Comments

Filed under Bread, Cooking, Recipes, Sour Dough Starter

Roasted Turkey

WOW!!  This is just about the best turkey I have ever had and I am not a great lover of roasted turkey.  Most every turkey I have had is dry and tasteless.  It can be very difficult to cook it just right because you have these big fat legs of dark meat that take much longer to cook than the thinner breast meat.  So what’s a cook to do?  In Anthony Bourdain’s video he just cuts the legs off and cooks them longer after removing the breasts from the oven .  Most of us don’t want to do that because we won’t have that pretty bird to put on the table. But really how many of us put it on the table to carve anyway.  If you are feeding a large group of people it is easier to slice it and serve buffet style.  So then no one gets to see the big browned bird.

I chose to leave the legs on my bird and to use a different method for preparing the turkey before putting it in the oven.  Searching the internet for the best method of cooking a turkey I kept coming across Alton Brown’s brining method.  I have read about this in Cook’s Illustrated and in  many other cookbooks.  I have soaked chicken in a salty brine before, but never thought about a turkey. 

If you choose to do your turkey this way you need to view Alton Brown’s video called “Turkey Brining Secrets”.   It is a great video . Then check out his recipe for roasting the turkey.  It really is very informative. I am following most of it.  First you have to thaw the turkey.  This will take about three days in the refrigerator.  You can speed the process by putting in the sink with cold water and changing the water about every hour.  Do not leave it out to thaw!  That is a good way to get sick.  

For the brine you need:

  • 1 c. Kosher salt
  • 1/2 c. light brown sugar
  • gallon of vegetable stock
  • 1 T peppercorns
  • 1 1/2 t. allspice berries (optional)
  • 1 1/2 t. chopped candied ginger (optional)
  • 1 gal. iced water

Heat a gallon of vegetable broth

Add 1/2 cup of brown sugar

Next add 1 cup Kosher salt

1 1/2 teaspoons of allspice berries

1 Tablespoon of Peppercorns

Heat all of this with the exception of the gal. of iced water until the salt and sugar are dissolved.  Let it cool and then refrigerate for  up to 2-3 days.   Make sure that you CHILL the brine.

Turkey in a bucket

You need a 5 gallon bucket to put the turkey in.  As you can see mine is bright orange.  The Athlete kindly picked this one up for me.  I was told it was the only one they had.  It really stands out I know!!  And I am not really advertising for Home Depot even though it looks that way.  A white one would have looked better on the blog.  You do get the right idea though.

Brine in bucket

Pour the chilled brine

Pour in gallon of ice water.

Put the brine and the gallon of iced water in the bucket.  Put the turkey in head first.  Okay, first time turkey cookers listen up.    Please make sure to remove all the giblets and the neck.  Look in both cavities!!!  Don’t laugh.  You don’t want to have  your brother-in-law  to carve the turkey and pull out the giblets still in the plastic bag.  That is a hard one to live down.   

Put a bag of ice on top of the turkey.  Place in the refrigerator for 8- 16 hours turning the turkey halfway through the brining process.

Rinse the bird and discard the brine.

Preheat the oven to 500 degrees.  500 is correct!!!

Stuff the cavity with a coarse chop of onion,and apple that you microwave for about 5 minutes in a cup of water. Then add a stick of cinnamon.  Pat the bird dry and coat with  canola oil.  Alton Brown put other aromatics in the cavity.  Check his out. 

Making a triangle to fit over the breast meat.

Make a covering from  foil to cover the breast.  Form it to the turkey then take it off and oil the side that will touch the turkey.  This is going to keep the breast from drying out.  Put this on the counter to use later. Do not cover the breast yet.

This bird is ready for a 500 degree oven for 30 minutes

Place the turkey on the lowest rack in the oven at 500 degrees for 30 minutes .  Take it out of the oven and reduce the heat to 350 degrees.  Below is the pic of what it should look like.   Place the meat thermometer in the breast  and set the temperature to 161 degrees.

Here it is after 30 minutes

 Cover with the tent.  I put foil on the tips of the wings.  I forgot to tuck them under.  Place thermometer in the breast.  Notice that I took the picture with the thermometer in the thigh.  I moved it but did not take a picture.  Sorry!  Cook until the thermometer registers 161 degrees. 

Ready to reach 161 degrees!

When the alarm on you thermometer goes off.  Take the turkey from the oven and cover with a tent of foil or a large lid and let it sit to rest.  If you slice it right out of the oven all the juices will flow out of the turkey.  You want to keep them in to have a nice juicy turkey.  You going to love this! 

Happy Cooking,

The Teacher Cooks

41 Comments

Filed under Brine, Cooking, Recipes, Turkey

Deviled Eggs

They are just waiting for you!!

I love deviled eggs.  They are so southern.  They are right up there with fried chicken, pimento cheese, biscuits, and potato salad.  Deviled eggs are just something that you take to a family reunion, to your aunt’s at Thanksgiving, or to a family picnic.  They are easy to make, but so many people don’t know how to cook eggs.  And that could be a big problem in this case! 

  So how do you prepare this almost perfect food wrapped in a shell.  Well, first  you do not BOIL eggs.  Eggs are either soft-cooked or hard-cooked in water.  Never, ever boiled.  Have you ever been to an Easter egg hunt where they used real eggs and you cracked into one and the yolk was green.  That’s what happens when you boil eggs.  A chemical reaction takes place inside the shell that turns the yolk green.  No one wants green eggs.  Unless of course you are Dr. Seuss.

Follow these simple steps and you cannot go wrong:  

Eggs in cold water

 I used large eggs here.  You can use extra-large eggs, but will take a few more minutes to cook.  Don’t use eggs that you just  purchased.  Fresh eggs are very hard to peel.  They don’ t have a big air space therefore it is hard to remove the shell.  Cover them with cool water not hot water which will affect the cooking time.  I usually add an extra egg in case one cracks, then you have an extra yolk to make  a little more filling. 

 Just do bring them to a boil and turn down to simmer.  Set your timer for 15 minutes.  You can take the saucepan off of the heat and set the timer for 30 minutes.  Either method is good.   

  Immediately plunge into cold water to stop the cooking process.  Use ice cubes if needed.   Crack the shell under running water.  Start from the large end when removing the shell.  It will be much easier because the air cell is located here.    Split the eggs lengthwise.  This will make a nicer presentation.  Place the yolk in a bowl.    

Cut eggs lengthwise

Mash with a fork

Add about a teaspoon of mustard

Drain olives

I like to add olives or dill relish to my eggs.  This is just my personal preference.  You may add sweet pickles or horseradish or whatever you like to flavor them.  

Mince olives


Add olives and mayonnaise to yolks

Be really careful when adding mayonnaise to the yolks.  Just a little will go a long way.  You can always add more but you cannot take out too much. This mixture will not work if it is too thin.  


Mix it up!

Fill 'em up!

Ready to put on plate!

This is it!  So easy and so good!  At my house half of these are gone before I can put them on a plate.  Make sure that you make extras.  You will need them I promise. 

 Happy cooking, 

 The Teacher Cooks  

30 Comments

Filed under easy, Eggs, quick, Recipes, side dish

Sausage Bread

This is yummy!At meal time we all want something fast, easy and great tasting to prepare.  Here is the answer.  This sausage bread is great!  You are going to love it for more reasons than just the taste. 

The recipe is two recipes that I combined one from a friend and the other from Southern Living.  It is a  great main dish with a salad or you can serve  as an appetizer at a party pairing it with a marinara sauce. 

Ingredients for sausage bread

Here's what you need to put this together!

Pillsbury French Bread

Spread the Dough out

Using Pillsbury French Bread Dough spread it out onto parchment paper.  Take it out of the refrigerator right before you need it.  If you take it out too soon it makes it very hard to work with.

Brown sausage

Brown sausage and drain

   Brown sausage in a skillet and drain.  For the best flavor I like to use the hot sausage. 

Sausage, egg, swiss cheese, cheddar cheese

Sausage, egg, cheeses, garlic, oregano, and basil

Here you have the drained sausage 1/2 cup swiss cheese, 1/2 cup cheddar cheese, 1 egg, 1/2 teaspoon oregano, 1/2 teaspoon basil. and 1/2 teaspoon garlic.  Mix together.

Ready to roll

Spread sausage mixture on the French bread dough

Rolling the dough

Roll up the dough lengthwise

 Roll the dough lengthwise.  It is pretty easy to peel the parchment paper off the dough if it sticks.  If you tear holes in it just pinch it together.  Pinch the ends together and tuck under.  Pinch the long side together and flip over.

Slash the dough

Make slashes is dough with a knife

Now just stick it the oven and bake.  This is so much easier than homemade pizza and satisfies the pizza craving.  

Here is the recipe.  Enjoy!

Sausage Bread

  • 1 lb. hot sausage browned and drained
  • 1 can refrigerated French Bread dough
  • 1/2 cup shredded swiss cheese
  • 1/2 cup sharp cheddar cheese
  • 1 egg slightly beaten
  •  1/2 teaspoon oregano
  • 1/2 teaspoon basil 
  • 1/2 teaspoon garlic

Cook sausage in a skillet until browned.  Drain.  Stir in the rest of ingredients together with sausage.   Unroll dough into a rectangular shape onto parchment paper.  Sprinkle evenly with sausage mixture.  Beginning with long side roll up, jelly roll style.  Turn seam side down on baking sheet, and pinch ends to secure filling inside. cut slits across top of dough with a knife or scissors.  Bake at 350 degrees for 30 minutes or until browned.  Let stand for 10 minutes before slicing.

Happy Cooking,

The Teacher Cooks

35 Comments

Filed under Bread, Brunch, Cooking, easy, Eggs, quick, Recipes, Sausage

Paula Deen’s Szechaun Chicken

1st Block Kitchen 5

1st Block Kitchen 5

These last two days have been really crazy for me.  Yesterday the local government station here came to film my class.  Yes, they did!!  I have never done anything quite like this.  Years ago I was on WSB radio, but you know no one can see you. All you have to worry about is what you say.  On TV you have to worry about how fat you look, or did you have a stupid grin on your face or if you have lipstick on your teeth and much much more.   I was a little scared.  No ! I was alot scared. My Tennessee friend called the day before to see if she could help with makeup and hair.  I needed some mental help…….but  I made it through without doing anything really stupid.  At least I think I did.  We’ll see when the broadcast is played for God and everyone to see .  Oh my Gosh,  I don’t know if I can stand to watch myself.  I have never watched a video of myself.  I’m too scared!!

Because there were six extra  people in my room some of which had cameras or lights it was hard for my students to concentrate on my demonstration.  At least that’s the excuse  I’m using for why some of them had no clue as to what they were doing in class today.  Now mind you 60% of them knew when to add the soy sauce or how to mince the ginger, but the other 40% were really struggling and I do mean struggling.  I will say that they all finished in time to eat,  clean their kitchens and get to the next class on time.  That is a good  thing!!! We are definitely discussing why it is important to know what you are doing before class.  It was if someone hit instant replay on my name all morning.  I must have heard it a million times!

This recipe is from Paula Deen”s  first cookbook and it is delicious.  Very Healthy!!  Very Tasty!!

I did not take pictures yesterday. Too nervous and forgot!  So today I took pictures as my students prepared their meal. Great job!!

This should make it easy for you to prepare for yourself and guests.  Let me be the first to say that this recipe is going to get you a lot of compliments.  No more Chinese takeout for you.   By the way my perfume of the day was sesame oil and hot chili paste.  I was a walking advertisement for my class.

3- 4 Boneless Chicken Breasts Butterflied

Butterfly with kitchen shears

Green Onions

Slice a bunch of green onions

Yellow Pepper

Slice a Yellow and Red Pepper

Broccoli Florets

Need a bunch of broccoli Florets

Fresh Ginger

1 1/2 tsp. minced fresh ginger

Sesame Oil

1 T Sesame Oil

Soy Sauce

1/4 cup Soy Sauce

I did not take pictures of two items.  I was busy running around putting out fires.  Not really, just helping the lost.

4 Tablespoons of Chili Paste

                                                                                   2 Minced garlic cloves

Cooking Chicken

Cooking Chicken in Sesame Oil & 2 T chili Paste

What happened to this photograph?  Oh my!!!!!!

We used an electric skillet for convenience in class.  I recommend that you use a large skillet or wok.  Do not worry about the paste turning a dark color and sticking to the pan.  I panicked the first time I prepared it, but you will deglaze the pan in the end.  The flavor will be incredible.

Take the chicken out after cooking about 4 minutes on each side.  Let it rest 5 min. and slice with the grain into long strips.  Let your husband, children, or guests do this while you finish the vegetables.

Angel Hair Pasta

Keep Angel Hair Pasta Hot

The recipe calls for 1 lb. of angel hair pasta.  I found this to be too much.  The chicken and vegetables make about 6 servings so make pasta accordingly.

Cooked Vegetables

This looks so good!

Add broccoli, onions, and peppers to the skillet as soon as you take out the chicken.  Pour soy sauce, 2 T of Chili paste, garlic, and about 1/4 cup of water and cook vegetables until just tender.

Sliced Cooked Chicken

Good job slicing the chicken!!

Add the sliced chicken to the vegetables and serve over hot angel hair pasta.  This is too good to be true.

Thanks to Paula Deen .  Here is her original recipe.

Szechuan Chicken with Angelhair Pasta

  • 1 tablespoon dark sesame oil
  • 1/4 cup chili-garlic sauce ( I found this in the vegetable section of the grocery.  It comes in a tube like toothpaste)
  • 4 boneless chicken breast ( I butterfly them so they will be thinner and cook faster)
  • 1 lb. of angelhair pasta ( I decreased the amount)
  • 1 1/2 pounds broccoli crowns cut into florets
  • 1 red bell pepper cut into strips
  • 1 yellow bell pepper cut into strips
  • 12 green onions thinly sliced
  • 2 cloves garlic minced
  • 1/4 cup soy sauce
  • 11/2 teaspoons minced fresh ginger
  • 1/4 cup water ( I added this especially if the skillet is hot a lot of the liquid will evaporate and you will need more)

Heat the oil and 2 tablespoons of the chili sauce in a large skillet over medium heat: add the chicken, and cook for 4 minutes on each side, or until cooked through.  Meanwhile bring a large pot of water to boil for pasta.  Add pasta to boiling water, cook as directed on package, and drain.  Remove the chicken from the pan and cut it into strips.  Add the broccoli, bell peppers, green onions, garlic, remaining chili sauce, soy sauce and ginger to the skillet.  Cook the vegetables stirring until they are crisp tender.  Add the chicken strips and cook until heated through.  Serve over the pasta.

Here is the 2nd place winner of the Iron Chef!

1st Block 3rd Kitchen

1st Block 3rd Kitchen

Happy Cooking,

The Teacher Cooks

93 Comments

Filed under Chicken, Chicken stir fry, Cooking, easy, quick, Recipes, vegetables

Szechuan Chicken Iron Chef Contest

DSCN0469

This is what  I cooked yesterday in class.  Today is the test.  Let’s see what’cha got!

Will post results today around 3 PM and voting will begin.  It will end at midnight Nov. 5,2009. Friday morning I will post the winner.  

This should be interesting since there are  not too many ways to plate this dish.  Let’s see who is the most creative and which group prepares the dish correctly .  Good luck and may the best chef win.

The Teacher Cooks

14 Comments

Filed under Chicken stir fry, Cooking, easy, healthy, quick, Recipes

Twice Baked Potatoes

Yummy Stuffed Potatoes

These are so good!

I love potatoes anyway you cook them.  They have been a favorite of mine since childhood.   I grew up in a very small town in south Georgia where my grandparents had a big farm.  They had what all farms had back then, chickens, horses, cows, and pigs .  They had a smoke house, a sugar cane mill to make syrup and a well.  They grew everything  peanuts, cotton, corn, watermelons, peas, beans, potatoes, okra, cucumbers, tomatoes, turnips,and the list goes on.  And get this they also had a big underground bomb shelter.  Go figure!!

Every Wednesday after school we would visit my grandparents.  Usually I would take a friend.  Bomb shelters make great playhouses.  Whatever my grandmother had cooked for lunch that day we would have  for an afternoon snack (meal).  She always made potatoes, just plain boiled potatoes.  They were so good.  They were seasoned with lots of love and I am sure butter. Okay, enough about why I love potatoes.

This is a great stuffed potato recipe that I have adapted from my friend Cile.  It is a favorite of ours especially when we are grilling.  It is easy and very flavorful.

I have to get on my soapbox here.  PLEASE don’t wrap up potatoes in foil to bake.   When you do that the pulp is slick, gummy and turns a dark color. It also takes forever because you  are steaming them .  Just wash the potatoes good and put them in a 425 degree oven. Most of them including the great big Idahoes will take an hour or a little more.  I’m telling you they will be so fluffy, billowy, soft and a beautiful pristine white when you pop them open. You’re going to say WOW!

Baked potatoes

Place in 425 degree oven for about an hour or more until soft

While they are still hot cut the top 1/4 off of the top of the potato.  Scoop out the cooked potato. Place in a mixing bowl.

Hot Baked Potatoes

Scoop out baked potatoes and place in bowl

Heat about 1/2 of milk and 1/4 stick of butter just until warm.  By the way this recipe can be doubled.

Warm milk and butter

Heat 1/2 cup milk with 1/4 cup butter until warm

Add milk and butter to the potatoes.  You may have to add more or less milk depending on the size of the potatoes.

Next add 1/2 cup of sharp cheddar, 3 slices of bacon cut into bits, and 2 tops of green onions sliced.  I pulled the cheese and the bacon out of the freezer.

Looking good

add 1/2 cup cheese, 3 slices of bacon bits, and green onions

Yum

Mix

All mixed

Ready to stuff the shells

Put the mixture in the shells and bake for about 20 min. if you can wait that long!

Cile’s Twice Baked Potatoes ( This is the doubled recipe)

  • 8 medium baking potatoes
  • 1 cup milk heated
  • 1/2 cup butter heated with milk
  • 1 cup grated sharp cheese
  • salt and pepper
  • 2 sliced green onions
  • 6 slices of bacon bits

Bake potatoes at 425 degrees for about 1 hour or until they are soft.  Cut 1/4 of top from potato and scoop pulp into a mixing bowl.  Heat milk and butter until warm.  Add to pototatoes.  Add remaining ingredients. Mix.  Stuff potato mixture into shells.  Bake at 325 degrees for about 20 min.

Enjoy!

The Teacher Cooks

33 Comments

Filed under baked potatoes, Cooking, easy, Grill, healthy, Recipes, side dish, Stuffed Potatoes, Twiced baked potatoes

The Best Dressed Cupcake is….

We are the winners!!!

This one got the most votes (31)!!!!

What a day Friday was!  I would pretty much call it organized chaos. I have never seen so much icing! We had loads of fun with this contest. The students really got into it. They did research on the internet, gathered pictures, made to do lists for each other , made drawings  of their designs and worked as a team to get the job done.

Those of you reading this that have done some cake decorating know that this is no simple task. I have taken several classes in cake decorating and will only volunteer to do the simplest of tasks. Especially after I volunteered to make a very good friend’s daughter’s groom’s cake.  Why I did that I will never know.  I practiced making the cake maybe 10 times.  We had cake everywhere.  I took it to every party.  I sent it with GI Joe to work every week. When it came down to decorating it I just could not bring myself to do it .  I took it to my neighbor who did catering on the side and she whipped it together in about an hour.  I would have stayed up all night.

Anyway cake decorating takes practice.  My students found this out in about 5 minutes.  What a good learning experience!  

Thanks to all of you that took the time to vote.

These two groups will get extra credit on a  project this week we are doing with Eating Disorders.

My students laughed when they heard this. Cupcakes , icing and eating disorders  that’s just wrong!!!

 Here is the 2nd place group with 15 votes.  By the way Kitchen 4 had 14 votes.  The top 3 came from First Block.  Way to Go!!!

Happy Cooking,

The Teacher Cooks 

We got 2nd place!

This was so creative!

14 Comments

Filed under Cake, Cooking, Cupcakes, Dessert, easy, quick, Recipes