Category Archives: Cooking

Cheese Biscuits – Quick Bread Lab

Almost perfect!!!

Almost perfect!!!

I love teaching!! No, I mean I really LOVE teaching! Today anyway. It makes my day when my students come into the classroom and can’t wait for me to call the roll because they are so eager to get busy with their assignment . There has to be a reason for this other than the fact that they are all starving.

I read something on Monday when I attended the Leonardo DiVinci exhibit that could be the reason for the eagerness . Di Vinci said, ” Study without desire spoils the memory, and it retains nothing that it takes in.” Could it be a spark of passion here that has created this excitement? I hope so.

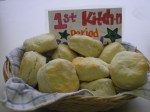
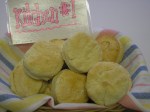
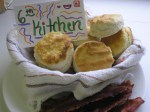
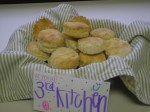
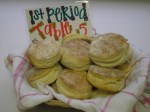
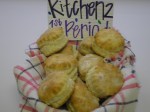
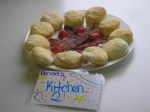
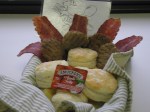
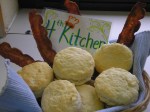
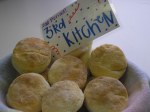
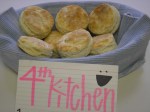
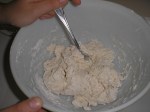
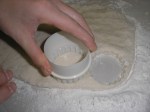
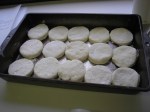
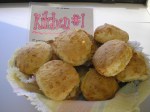
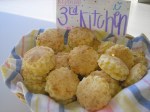
 Cheese biscuits are the last of our quick bread labs and we go out with a perfect 10. As you look at the pictures you can see they did great! One group put the cheese in at the wrong time, but recovered very well. They learned from the first time not to add too much flour and surprisingly they were very good . We had a couple of equipment malfunctions. One oven was turned off by mistake and another did not heat properly.

 I now feel as if our lab is  a small reproduction of ” Top Chef” , because there is so much competition between the groups to be at the top of the post. It is quite comical. You would think that I am giving out money as an award. Competition is good, but I have to think of a way to tone this down before it ruins some friendships.

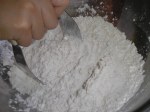
How do you prepare these little cheesy morsels? Check out Making Biscuits From Scratch and make one little change. Grate 1 1/2 cups of sharp cheddar cheese and add after cutting in the shortening.

Some information about grating cheese:

  • Use a food processor
  • Go ahead and grate a lot of it at one time
  • Freeze what you don’t use

 You might ask why not save time and use pre-grated cheese? I am not totally against it but, it is dry and not as flavorful. It is more expensive, too.

 Okay I have to get to the gym . I ate more than my usual taste of each biscuit today. They were just sooo good that I could not resist. Hopefully I can STEP some of these calories off before they attach to my body as fat.

Enjoy the Bake-off pictures!

Happy Cooking,

The Teacher Cooks

Very Good

Very Good

12 Comments

Filed under Biscuits, Brunch, Cheese, Cooking, easy, quick, Recipes

Cheese Biscuits –Coming up Tomorrow

Here's what we are cooking up in our kitchens tomorrow!!

Here's what we are cooking up in our kitchens tomorrow!!

This is the last lab for quick breads.  It should be a good one.  They are all ready and eager.  Tune in tomorrow for the bake off!!!

Happy Cooking,

The Teacher Cooks

Leave a comment

Filed under Biscuits, Cheese, Cooking, easy, quick, Recipes

Cinnamon Rolls


Awesome Group Work!

Awesome Group Work!

The smell of warm cinnamon rolls permeated the halls of our school today.  You can imagine how many visitors I had popping their heads or their bodies into my classroom to find out what we were cooking that smelled so delicious.  This was the second time for my chicklets to use biscuit dough.   They did very well.   You can try these for yourself if you are in the mood for cinnamon rolls and do not have the time to make the yeast roll variety.  These can be rolled out and cut in less than 15 minutes.  Can’t you just taste  them now along with a hot cup of coffee for breakfast?    Come on, if you can make biscuit dough you can make these easily.

How do you make these wonderful rolls?  Well, if you have mastered my post “Making Biscuits From Scratch”  you can do this.  After rolling out the dough into a rectangle a little smaller than a 9 x 13 inch pan, spread 1/4 cup granulated sugar mixed with 1 teaspoon of cinnamon.  Here is a photo.

Rolled dough with cinnamon and sugar

Rolled dough with cinnamon and sugar

  • Starting on the long side of the dough roll the dough up tightly. 
  •  Pinch the dough together when you get to the end. 
  • This dough is very forgiving.  If it sticks to the wax paper just take a straight edge spatula and push the dough toward the roll.  Pinch holes that you might make together.   
  • The diameter of the roll should be the same from end to end. Push the ends toward the middle to shorten the roll.  This should help with the diameter.
Roll dough jellyroll style

Roll dough jellyroll style

Now here is a trick I learned from some cookbook.  Use dental floss to cut the dough.  Pull off about 10 inches and hold the floss the same way you would when flossing teeth.  Place the floss under the dough and pull together quickly to cut.  This will keep your rolls nice and round.  See the photo.

Place floss under the dough and pull to middle

Place floss under the dough and pull to middle

Cutting through the dough

Cutting through the dough

Place in a 9×13 inch lightly greased pan.  Bake at 425 degrees for about 15 – 20 minutes.

Place in pan to bake

Place in pan to bake

When you take them out of the oven ice them with a heaping cup of powdered sugar mixed with just enough milk for the correct consistency.  Usually it takes about 1-2 tablespoons.  You can flavor with vanilla, lemon, orange, or almond flavoring.  Serve hot.

Here is what we cooked up today.  You take a look while I head to the gym after tasting 12 of these wonderful little things!!

These were very good!

These were very good!

You are all sweethearts!

You are all sweethearts!

These are bakery style!

These are bakery style!

I love your group effort!

I love your group effort!

Very Good! Where's the Bacon?

Very Good!

Strawberry icing was fantastic!!!!

Strawberry icing was fantastic!!!!

Excellent work!

Excellent work!

Tasted very good!

Tasted very good!

Great!  Where is the bacon?

Great! Where is the bacon?

Picture Perfect!

Picture Perfect!

What a pan of rolls!!!

What a pan of rolls!!!

Happy cooking,

The Teacher Cooks

42 Comments

Filed under Biscuits, Cinnamon Rolls, Cooking, easy, quick, Recipes

CINNAMON ROLLS —Rolling in tomorrow

blog 225

3 Comments

Filed under Biscuits, Cinnamon Rolls, Cooking, Dessert, easy, quick

Oatmeal Cookies


blog-2151

I have been baking as long as my mother would let me in the kitchen.  Which was always.  She was great about cooking as long as I would clean the kitchen.  But, I only could bake.  No main dishes or vegetables or anything like that.  Why?  I guess it was because baking to an extent is very cheap.  Flour, sugar, eggs, milk and butter that’s about all you need.  We were on a very tight budget.  Sooo I have been baking for a long time. And you know I don’t even care for sweets that much.  I just love to bake.  Here is another recipe back in the day of the first few years of teaching.  It is from Quaker Oats website.  It no longer appears on the box.

First a few tips about baking cookies:

  • Make sure that you use butter which I prefer or margarine for baking.  Do not use whipped or low-fat margarine.
  • Ingredients should be at room temperature.
  • Butter should be soft, but not too soft or the cookies will flatten as they bake
  • Use parchment paper on your cookie sheets. This saves time in washing cookie sheets.
  • Find a good cookie sheet.  Expensive is not always the best.  A shiny cookie sheet is better than dull.
  • Do not use your cookie sheet for any other food for example to make cheese toast .
  • Be careful about the cooking time.  You should know your oven.  Does it cook quicker or slower than the recipe recommends?
  • Just 1 minute more cooking time for cookies is a lot.  Remember these are small little things!

    Measure all ingredients separately

    Measure all ingredients separately

Softened Butter and Sugars
Cream butter and sugar

Cream butter and sugar

Add egg and vanilla

Add egg and vanilla

Add dry ingredients except oats

Add dry ingredients except oats

Mix well

Mix well

Stir in oats

Stir in oats

Place on baking sheet with parchment paper

Place on baking sheet with parchment paper

Quaker’s Best Oatmeal Cookies

  • 11/4 cups butter, softened
  • 3/4 cup firmly packed light brown sugar
  • 1/2 cup granulated sugar
  • 1 egg
  • 1 teaspoon vanilla
  • 11/2 cups all-purpose flour
  • 1 teaspoon baking soda
  • 1/2 teaspoon salt (optional)
  • 1 teaspoon ground cinnamon
  • 1/4 teaspoon ground nutmeg
  • 3 cups Quakers Oats old fashioned

Heat oven to 375 degrees.  Beat together margarine and sugars until creamy.  Add egg and vanilla: beat well.  Add combined flour, baking soda, salt and spices: mix well. Stir in oats: mix well.  Drop by rounded tablespoonfuls onto ungreased cookie sheet.  Bake 8 to 9 minutes for a chewy cookie or 10 to 11 minutes for a crisp cookie.  Cool 1 minute on cookie sheet: remove to wire rack.  Cool completely.  Store in a tightly covered container.

Makes about  4 1/2 dozen

ENJOY!

The Teacher Cooks

61 Comments

Filed under Cookies, Cooking, Dessert, Oatmeal, Recipes

Cajun Pork Roast

Low calorie, easy and delicious!

Low calorie, easy and delicious!

Another day at home with little water.  I am clean though.  Just took a bath in about 2 inches of water.  Brought me back to the  days of  staying  at my grandmother’s farm with no running water.  It was fun when I was 5 years old , but now you could say I am spoiled!  The news is that it could be into next week before our water is back to normal.  It could be worse.

I usually grill pork tenderloin , but with all the rain I pulled out an old recipe from  pork The Other White Meat.   Pork is so versatile.  I serve this with Hashbrown Casserole ( I will share the recipe later ) or a baked potato and something  green like asparagus, broccoli, or green salad.  All of this is quick and easy to do.  Here is the recipe.


Cajun Pork Roast

  • 2 lb. boneless pork loin roast
  • cooking oil
  • 3 Tbs. paprika
  • 1/2 tsp. red pepper
  • 1 Tbs. garlic powder
  • 2 tsp. oregano
  • 2 tsp. thyme
  • 1/2 tsp. salt
  • 1/2 tsp. white pepper
  • 1/2 tsp. cumin
  • 1/4 tsp. nutmeg
Combine all the seasonings

Combine all the seasonings

Brush the roast with oil

Brush the roast with oil using Le Creuset silicone brush

Rub seasoning over roast

Rub seasoning over roast

Place in pan and roast 350 degrees

Place in pan and roast 350 degrees

Roast until internal tempt. is 155 degrees

Roast until internal tempt. is 155 degrees

Your prep time  is only about 5 minutes and the oven does the rest.  After taking out of the oven let it rest for about 10 minutes.  This serves  6 at 196 calories each.  ENJOY!!

The Teacher Cooks

12 Comments

Filed under Cooking, Pork Roast, Pork tenderloin, Recipes

The Best Ever Chocolate Sheet Cake

A Chocolate Lovers Dream!!

A Chocolate Lovers Dream!!

The last two days here have been bad!!  I am praying for all the families that have lost loved ones in this horrible rain. We have been very blessed, but I can tell you first hand what it is like to have your house flooded.  It is just stuff, though.  Anyway…….. We need something to make us all feel better so let’s talk chocolate.  This is my GO TO dessert for company, ALTA, potluck, parties and brunch.  You get the picture. It works for most any event.  I promise you all your friends and family will love it!!!

I first became acquainted with this special cake when I was a new teacher in Wilkinson County. Marjoe Baisden gave me her version.  Since then I have tweaked it a bit.  So here it is for you to just put your face into it if you want to.  That is what GI Joe wants to do every time that I make it.  He likes it hot with vanilla ice cream, but I have seen him eat right out of the pan with a spoon.

Yummy Chocolate Sheet Cake

  • 2 cups sugar
  • 2 cups self rising flour
  • 2 sticks of butter
  • 1 cup water
  • 1/4 cup cocoa
  • 1/2 cup buttermilk
  • 2 eggs
  • 1 teaspoon vanilla

Mix dry ingredients.  In saucepan melt butter, cocoa and water on low heat.  Add to dry ingredients. Mix. (DO NOT use a mixer)   Slightly beat eggs, buttermilk and vanilla.  Add to mixture.  Mix. Pour into a 15 x 10 x 1 in. jelly roll pan that has been greased and floured. Bake about 20 min. at 400 degrees.

Frosting

  • 1 stick butter
  • 3 Tablespoons cocoa
  • 5 Tablespoons milk
  • 1 box powdered sugar
  • 1 cup chopped pecans

Melt butter, cocoa, and milk.  Do this on low heat.  If heated at too high a temperature the butter will clarify making your icing  separate.  Add to sugar and nuts.  Mix.  Frost cake while hot.  Place icing by the  tablespoon all over the cake then smooth out the frosting.  This will keep  from tearing the cake as you frost it.   Here are pictures to guide you along.  Enjoy!

Flour and sugar in a mixing bowl

Flour and sugar in a mixing bowl

Melting butter, water and cocoa

Melting butter, water and cocoa

Greased and floured jelly roll pan

Greased and floured jelly roll pan

Melted butter, cocoa and water

Melted butter, cocoa and water

Whisking eggs, buttermilk and vanilla

Whisking eggs, buttermilk and vanilla

Mixing dry and wet ingredients

Mixing dry and wet ingredients

Ready to bake

Ready to bake

Frosting - melting butter and cocoa

Frosting - melting butter and cocoa

Powdered sugar, chocolate and nuts for frosting

Powdered sugar, chocolate and nuts for frosting

Chocolate Icing

Chocolate Icing

Cooked cake

Cooked cake

Ready to dig into!!!

Ready to dig into!!!

26 Comments

Filed under Cake, Chocolate, Cooking, Dessert, Recipes, Sheet Cake

Tomato Okra Casserole— Summer’s Ending!!!!

This is sooo good!!!

This is sooo good!!!

This is going to be the  last of tomatoes and okra for a while.  At least fresh!   The Alabama girl gave me this delicious recipe.  She and I taught together for 3 1/2 years.  She is a great teacher and a great cook.  I miss her terribly,but that is another story.  Anyway,  last year we had a potluck dinner and she brought this dish and I am going to share it with you.

I get fresh vegetables from the CSA in our area and had a pound of okra to work with.  If you do not have fresh okra frozen will work. 

Tomato Okra Casserole

  • 6 Tbl. onion chopped
  • 2Tbl. Bacon grease
  • 1/4 t. curry powder
  • 1/4 t. red pepper
  • 2 1/2 T Parmesean Cheese
  • 1 qt. tomatoes peeled cooked or canned
  • 1/2 t paprika
  • 1  T sugar
  • 1 1/2 t salt
  • 8 Ritz crackers crushed

Saute onions in bacon grease.

Her is how I got the bacon grease.  Save the bacon for later.

Here is how I got the bacon grease. Save the bacon for later.


Sauteing onions

Sauteing onions

Add okra and cook until tender.

Add okra and cook until tender.

Add tomatoes and seasonings.  Stir well.

Add tomatoes and seasonings. Stir well.


Put in greased casserole

Put in greased casserole

Top with cheese and crackers.  Bake at 350 degrees for about 35 minutes.  You are going to love this!!!  The okra is not slimy it is just plain good. 

Happy cooking,

The Teacher Cooks

10 Comments

Filed under Cooking, Recipes, Tomatoes & Okra

BISCUITS Made from Scratch

WOW!

WOW!

Biscuits made from scratch are in most households a lost art.  I teach that skill for many reasons.  Homemade biscuits are good, better than canned and frozen ones.  They are cheap to make.  You can put them together in no time.  They are versatile.  And most importantly it makes you feel good about yourself when someone says ” You made this?  WOW ! I am impressed. ”  So today my students were given the task of making homemade biscuits and surprisingly they did very well.  This is not the easiest thing to do if you have never handled biscuit dough before.  It is hard to judge how much milk to add and how many times to knead the dough.  Usually there will be one disaster out the classes , but not today.  They all did pretty well.  I will have to brag on second block.  They were all super.

So how do you put these things together.  Really it is quite easy and very quick.  It just may take a few times to get the knack of it.  My first biscuits were not edible so there is hope!!   Always use WHITE LILY self rising flour and CRISCO.  I am not advertising for White Lily flour, but this is the only kind that works for me.  I use the recipe that is on the package.  You cannot go wrong.

  • 2 cups of White Lily self-rising flour
  • 1/4 cup Crisco
  • 2/3 cup – 3/4 cup milk


Using a pastry blender cut shortening in flour

Using a pastry blender cut shortening in flour


Using a pastry blender cut Crisco into flour until it is about the size of small peas.  This makes the biscuits tender and flaky.

Add milk and stir with a fork

Add milk and stir with a fork

Do not add all the milk at once.  The amount to humidity in the air will determine  the milk you will need.  The dough should be stirred with a fork and it should pull away from the sides of the bowl.  Pour on wax paper with flour.  Sprinkle a little flour on top to keep it from being sticky and put flour on your hands.  Knead the dough for 4 to 6 times.  The dough should be smooth and spongy. These two things are important when making biscuits :  1.  Do not handle the dough too much and 2.  Do not add too much flour when kneading.  Flatten out with your hands to a thickness of 1/2 inch and cut out with a biscuit cutter or something with an open end that will not trap air and cut smoothly.   

Cutting out biscuits

Cutting out biscuits

Place the biscuits flour side in the bottom of a slightly greased pan. Bake at 500 degrees for 10 min. 

Ready to bake

Ready to bake

That’s all there is to it.  Just give it a try.  Then practice and then practice again.   Now here are the results of today’s bake off!!

42 Comments

Filed under Biscuits, Cooking, Recipes

Waffles

Here you are again!

This is GOOD!

Here you are again!

Here you are again!

Piled High and Ready to Eat!

Piled High and Ready to Eat!

I could not choose one for the top of the post today so you all three have the honors.  Great job.

Between pancakes and waffles, waffles win everytime for me.  I love the crunchy ones sprinkled with confectioner’s sugar.  Reminds me of a funnel cake. Yum !  Today I was living the tasters best life.  These were sooo good.

Yesterday I was a little worried during the demonstration.  It was almost a catastrophe.  Let me just tell you that last semester some good intentioned student cleaned the waffle iron  a little too good.  Not knowing this I  poured my waffle batter in there  like I always do.  Waited the appropriate time.  Opened it up and in front of God and everyone was a mess of stuck batter.  For a minute there I thought I would faint.  I turned this into a “teachable moment”  and we had a lesson on seasoning a waffle iron.  Using a pastry brush or paper towel coat the waffle iron top and bottom with vegetable oil.  Turn on for about 15 minutes.  To make the class even better  one of my “thinking ahead” students said she thought we should season all 8 of our waffle irons.  GREAT IDEA!

So today went without a hitch.  What can I say ?  But,  I have some great students that are loving this cooking.

Here is what they cooked up today.

Happy Cooking,
The Teacher Cooks

Good Job!

Good Job!

Looks Yummy!

Looks Yummy!

Strawberries added the touch!

Strawberries added the touch!

Smiley!!

Smiley!!

Great Waffles!

Great Waffles!

Just 4 U!

Just 4 U!

Awesome!

Awesome!Good Looking!

So Cute!

So Cute!Just look at these they are GREAT!!!

6 Comments

Filed under Cooking, Recipes